Vernice's Fantasy Fudge
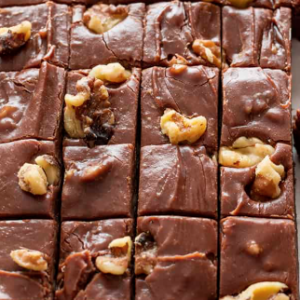
Fantasy Fudge is a classic, creamy chocolate confection that's both rich and indulgent. This recipe combines sugar, butter, evaporated milk, chocolate chips, marshmallow creme, and optional nuts to create a delightful treat. Follow these detailed instructions to make Fantasy Fudge, even if you're new to candy-making.
Equipment
- 9x13-inch baking pan
- Parchment paper or aluminum foil
- Non-stick cooking spray or butter
- Medium-sized heavy-bottomed saucepan
- Wooden spoon or heat-resistant spatula
- Candy thermometer (optional, but recommended)
Ingredients
- 3 cup granulated sugar
- ¾ cup unsalted butter (1 1/2 sticks)
- ⅔ cup evaporated milk (5-ounce can)
- 12 8 oz semi-sweet chocolate chips (about 2 cups)
- 7 8 oz marshmallow creme (1 jar)
- 1 tsp pure vanilla extract
- 1 cup chopped nuts (optional; walnuts or pecans work well)
Instructions
Prepare the Pan:
- Line a 9x13-inch baking pan with parchment paper or aluminum foil, leaving some overhang on the sides to easily lift the fudge out later.
- Lightly grease the lining with non-stick cooking spray or butter to prevent sticking.
Combine Sugar, Butter, and Evaporated Milk:
- In a medium-sized heavy-bottomed saucepan, combine the granulated sugar, unsalted butter, and evaporated milk.
- Place the saucepan over medium heat. Stir continuously with a wooden spoon or heat-resistant spatula until the butter melts and the sugar dissolves completely.
Bring to a Rolling Boil:
- Increase the heat slightly to bring the mixture to a full rolling boil. A rolling boil is when the mixture bubbles vigorously and doesn't stop bubbling when stirred.
- Once it reaches a rolling boil, continue stirring constantly to prevent scorching.
Boil for Five Minutes:
- Maintain the rolling boil for exactly 5 minutes, stirring continuously. Timing is crucial; use a timer to ensure accuracy.
- If using a candy thermometer, the mixture should reach 234°F (soft-ball stage).
Remove from Heat and Add Chocolate Chips:
- After 5 minutes, remove the saucepan from heat.
- Immediately add the semi-sweet chocolate chips to the hot mixture.
- Stir vigorously until the chocolate chips are completely melted and the mixture is smooth.
Marshmallow Creme and Vanilla:
- Add the marshmallow creme and pure vanilla extract to the mixture.
- Stir until the marshmallow creme is fully incorporated and the mixture is uniform.
Add Nuts (Optional):
- If you're including nuts, fold in the chopped nuts now, ensuring they're evenly distributed throughout the fudge.
Transfer to Prepared Pan:
- Quickly pour the fudge mixture into the prepared baking pan.
- Use a spatula to spread it evenly, smoothing the top.
Cool and Set:
- Allow the fudge to cool at room temperature until it's firm, which may take about 2 hours.
- For quicker setting, you can place the pan in the refrigerator.
Cut into Squares:
- Once set, use the overhanging parchment paper or foil to lift the fudge out of the pan.
- Place it on a cutting board and cut into small squares using a sharp knife.
Storage:
- Store the fudge in an airtight container at room temperature for up to 2 weeks.
- To prevent pieces from sticking together, place wax paper between layers.
- For longer storage, you can freeze the fudge. Wrap it tightly in plastic wrap and place it in a freezer-safe container. Thaw at room temperature before serving.
Notes
Additional Tips:
- Avoid Grainy Fudge: Ensure all ingredients are at room temperature before you start. Stir continuously during boiling to prevent sugar crystals from forming, which can cause graininess.
- Consistency: Precise timing during boiling is essential. Boiling for less than 5 minutes can result in soft fudge, while overboiling can make it too hard.
- Flavor Variations: For different flavors, you can substitute semi-sweet chocolate chips with milk chocolate or dark chocolate chips. Adding a few drops of peppermint extract can create a festive minty fudge.


")
No Comment! Be the first one.